DIY Quadcopter with Pixhawk4
A from-scratch build log of a man-packable surveillance quadcopter on a Pixhawk flight controller, including every part, why it was chosen, and the trial and error that got it flying.
In this build, I shall bring out all the steps in building a quadcopter from scratch.
The decisions required to decide upon the performance and expectations of a quadcopter are:
- Purpose / why to build one? What do you want to achieve?
- Size of quadcopter
- Time of flight
- Number of days/hours available to assemble
My sole purpose was to learn the basics and try my hands on making one. I wanted to make a decent size that can be man-packed and easily operated by a single person to carry out surveillance of the intended area of operations in day and night. Minimum time of flight required was 15 minutes.
I had a month to work on it, and I started off in the highest of enthusiasm and spirits to launch it as soon as possible.
Skills required: basic electronics, soldering, assembling, and lots of trial and error.
Before I proceed with the build, I shall list out all the important items required to assemble a quadcopter. All parts are available commercially off the shelf from an online store or from Shop No. 595/596 in Lajpat Rai Market, Chandni Chowk. I source my parts from both online and offline stores.
Items required for assembly
- Flight controller
- Frame
- ESC (Electronic Speed Controller)
- BLDC motors
- Propellers
- Remote controller
- PPM encoder
- Battery
- GPS
- Radio link
- Vibration damping platform
- Miscellaneous (solder station, screwdrivers, connectors, heat-shrink tubing, wire crimps, nose pliers, wire strippers)
Let us have a brief overview of all the above inventory items to start off with the build.
Flight controller
It is the brain of the quadcopter. You need it to control the flight with the help of an onboard stabilization mechanism using sensors, user inputs, and algorithms. The flight controller measures the orientation and position of the device and adjusts the motor speed to keep it stable. It receives pitch, roll, yaw, and throttle from the pilot and adjusts the motor speed accordingly to maintain stability. Another desired feature of a flight controller is to monitor the battery levels and maintain all failsafes for the quadcopter’s safety.
Pixhawk is an open-source system used for unmanned aerial vehicles (UAVs) and other robotic applications. It is popular among hobbyists, researchers, and commercial UAV operators because of its flexibility, reliability, and ease of use.
I selected a Pixhawk for my project, the main features of which are:
- Main FMU processor: STM32F765, 32-bit Arm Cortex-M7, 216MHz, 2MB memory, 512KB RAM
- IO processor: STM32F100, 32-bit Arm Cortex-M3, 24MHz, 8KB SRAM
- On-board sensors: Accel/Gyro ICM-20689; Accel/Gyro BMI055 or ICM20602; Magnetometer IST8310; Barometer MS5611
- GPS: u-blox Neo-M8N GPS/GLONASS receiver with integrated IST8310 magnetometer
- Power: power module output 4.9–5.5V; USB input 4.75–5.25V; servo rail input 0–36V
- Weight & dimensions: 15.8g, 44 x 84 x 12mm
- Operating temperature: -40 to 85°C
Frame
A suitable frame is of utmost importance for the durability and performance of the quad. It is the backbone of your device, so the more rugged your frame, the better the performance. It houses all your circuitry, the power distribution module, and the motors, along with additional sensors, the battery, and the radio links.
There are four types of frames commonly used to build a drone:
- H frame
- X frame
- Hybrid X frame
- Box frame
Material: the most suitable and durable ones are made of carbon fibre. I purchased a commercial off-the-shelf frame available at robu.in.
ESC (Electronic Speed Controller)
An opto-coupled ESC is mandatory to control the speed of a quadcopter by isolating the high-power side from the low-signal side, transmitting the throttle from the input to the output side of the ESC.
A ReadytoSky 40A 2-6S ESC was procured from robu.in, which has a fast throttle response. It has good compatibility with 2-6S LiPo batteries.
BLDC motors
Pixhawk supports PWM, Oneshot, DShot ESCs, DroneCAN ESCs, PCA9685 ESC (via I2C), and some UART ESCs for receiving signals from the pilot to control the BLDC motors running the propellers. I used MT2204 2300KV BLDC motors for my build, sourced from robu.in.
Propellers
These are the wings of the quadcopter, and high-quality rigid propellers are a must for stability and durability. I used an Orange carbon-fibre propeller, which has a 15° angle design at the end of the propeller to avoid whirlpool while the multi-copter is flying. There are two sets of propellers: CW (clockwise) and CCW (counter-clockwise).
Remote controller
To control the quadcopter for its pitch, roll, yaw, and throttle, which ultimately move it up, down, left, right, forward, and reverse, we need a remote for FPV operation. I selected a Flysky FS-i6S 2.4GHz 10CH AFHDS 2A RC transmitter with an FS-iA10B 10CH receiver.
Using a drone is easy, but controlling one is a tough job, and that is why a transmitter is needed. It uses radio signals to send commands wirelessly to a radio receiver connected to the aircraft. Flysky is one of the popular brands manufacturing a diverse range of high-quality, affordable transmitters and receivers.
PPM encoder
Pulse Position Modulation is an analogue signal, but instead of using a separate wire for each channel, PPM stacks each signal one after another to send them all along the same wire. This makes wiring your R/C receiver to your autopilot much easier. Some autopilots such as the Pixhawk require a PPM (or SBUS) input, so if you are using a PWM receiver you will need a PPM encoder, which converts several PWM signals into a single PPM output. The nice thing about PPM is that it reduces all channels into a single wire.
Battery
The fuel for your quadcopter: the better the fuel, the better the performance. Performance here is measured by flight time and output consistency. I used an Orange 8000mAh 4S lithium polymer (LiPo) battery pack, equipped with heavy-duty discharge leads to minimise resistance and sustain high current loads.
GPS
A ReadytoSky u-blox NEO-M8N high-precision GPS module with a built-in compass for the Pixhawk flight controller. With its onboard compass, low power consumption, and high precision, the ultimate accuracy is around 0.6 metres. It includes an HMC5883L digital compass.
Vibration damping platform
To give stability to the quadcopter, we need to mount the Pixhawk (or any flight controller) on a very stable, vibration-absorbing platform. Its onboard MEMS sensors are sensitive to vibration, which if not handled can lead to reduced efficiency, instability, increased wear and tear, and crashes. I found one at makestore.in, and the results proved themselves. This platform ensures a super-stable Pixhawk for a stable flight.
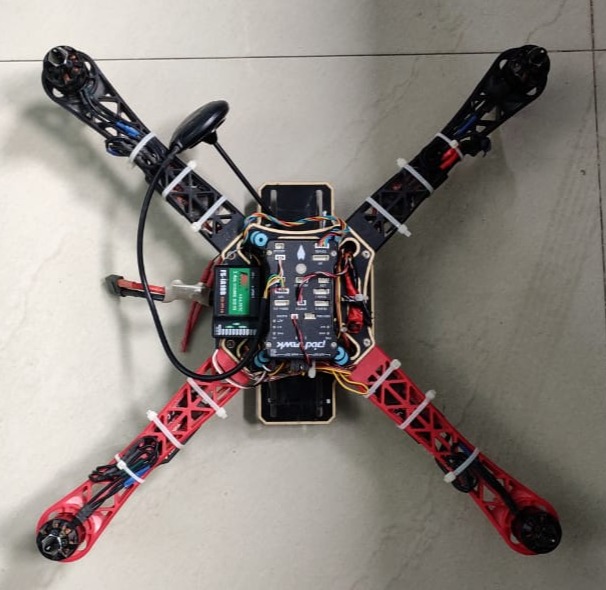
Putting it all together
Orientation
Almost all flight controllers have a heading-mark arrow. The controller should be placed on the frame top-side up, oriented so that the arrow points towards the front of the vehicle (on all aircraft frames: airplane, multirotor, VTOL, ground vehicles, etc.).
Assembly notes
After hit and trial and changing about 3-4 frames, I was finally able to settle on one for better stability and sturdiness. Then came mounting the Pixhawk 4 after frame assembly, and calibration with Mission Planner.
The landing gear broke on the first trial, so I had to work out a via-media: I used an old cloth hanger to make a DIY landing gear, mounted the quadcopter on it, and got it ready for another trial.
Originally published on sslabs.in.